High on the list of my kids’ never-ending curiosity is the weather.
Dad, what are clouds?
Is it going to rain today?
How does the news know the weather?
We’ve talked about equipment, measurements, and pressure. But I realized that instead of answering questions with quick internet searches, it might be more fun to do some research ourselves.
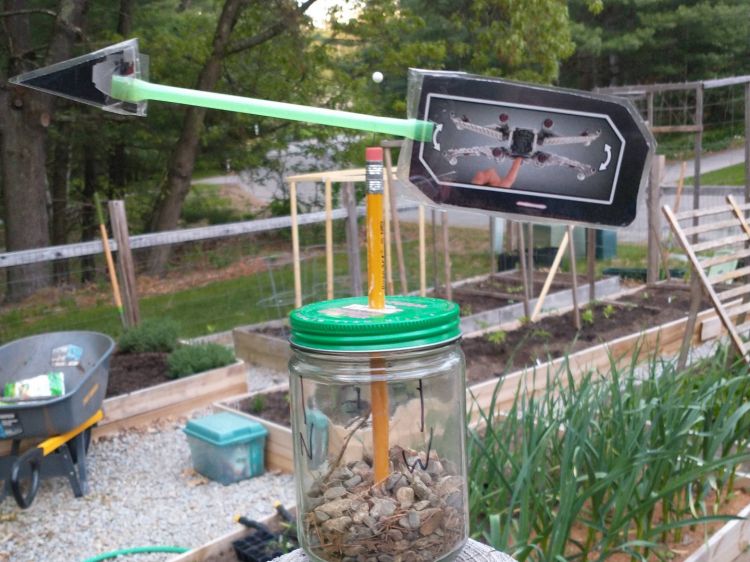
So we built our own weather station with three devices: a weathervane, a rain gauge, and a barometer.
These projects use materials you probably already have at home, and they’re safe so that kids are able to help in the process.
Keep in mind that the main goal is not to get precise weather data, but to show children the scientific principles behind weather, and get them excited about science.
How to build your own weathervane
Stats
Time: 10 minutes
Cost: Less than $5
Difficulty: Easy
Materials
- An empty clear plastic container with a lid (like a peanut butter jar)
- Modeling dough
- Rocks or sand
- A pencil with an eraser on the back
- A straw
- A needle (or pin)
- Cardstock
- Tape
- Glue
Tools
- Scissors
- Colored pencils, markers, or crayons
Instructions
1. Cut a hole in the center of the lid. The opening must be large enough to fit the pencil snugly, so it doesn’t wiggle.
2. Insert the pencil through the hole, point first. When you close the container, the eraser should be on the outside of the lid.
3. Stick a glob of modeling dough about the size of a marble inside the container, at the bottom. Push the pencil into it. The pencil should be as vertical as you can get it.
4. Fill the bottom of the container with rocks or sand. This will weigh it down and keep it from blowing over in the wind.
Note: You can also put in enough modeling dough to provide weight rather than using rocks. My kids weren’t willing to sacrifice that much in the name of science, though.
5. Draw and cut out a triangle and a square from the cardstock. You’ll be making an arrow with your straw, and the square will serve as its fletching, or fin—though you can really make it any shape you like. The triangle will serve as an arrowhead pointing in the wind’s direction. The only requirement is that it’s smaller than the fin.
6. Color and decorate the fin and arrowhead. We decided to make ours out of the packaging for a Lego X-wing starfighter, so no additional decoration was necessary. However you decide to decorate, make sure that it doesn’t alter the balance and weight of the vane.
Pro tip: Once you’re done decorating, you can laminate the cardstock or wrap it in tape to help protect it against the rain.
7. Use scissors to cut ¼- to ½-inch slits in each end of the straw.
8. Slip the arrowhead and fin inside each slit. Make sure the point of your triangle looks away from the straw. Glue or tape the pieces in place.
9. Stick the pin through the straw, cheating toward the fin end. This offset will help keep the straw straight and level. We set ours about half an inch from the fin.
10. Insert the pin into the eraser. The straw should spin freely on the pin, approximately level. If you need to, move the pin to adjust the balance.
11. Draw the points of the compass on the container. Where exactly you do this will depend on where it’s easily visible to you. You can use the lid, but if you’re placing your weathervane higher up, you might want to do it elsewhere. We put ours on a fence post, so we drew the points of the compass on the sides of the container.
How to use your DIY weathervane
Put the weathervane outside in an open area, well off the ground—the higher it is, the better it’ll react to the wind. Use a compass—most phones have one—to orient the weathervane correctly, and keep it as far from obstructions like trees and buildings as you can.
Contrary to what you might think, the arrow will not point in the direction the wind is traveling, but to where it’s coming from. This is because the wind pushes the fin of the weathervane; if your arrow is pointing north, that’s where the wind is coming from.
Track the direction of the wind over time, and talk with your kids about what it means. Notice if the wind is usually blowing in one direction before rain, or how it changes over the course of a day. You should also pay attention to how it is related to temperature. Often in the northern hemisphere, cold air comes out of the north and warm air comes from the south. Finally, you can also ask your children to help keep track of subjective measurements of wind speed, and teach them to record how the wind is blowing on a particular day.